V-50
Audio Comparisons Click on the following links to hear samples of V-50 audio. Each sample link on the left is accompanied on the right by a description of the corresponding audio file. |
| V-50
Audio Comparisons Click on the following links to hear samples of V-50 audio. Each sample link on the left is accompanied on the right by a description of the corresponding audio file. |
| • V-50 1A, Raw Audio | This is a sample of the raw audio
file transferred from the V-50 Session 1A master tape, with no digital
signal processing (DSP) of any kind. This is typical of the audio
quality on the Snakelin Moore version. |
| Leavethisgoddamtext • V-50 1A, with DSP Leavethisgoddamtextinherdammit |
This is the same audio segment as the one above, using my first-approximation DSP configuration. I ended up reprocessing it with better results. |
| • V-50 6B, Raw Audio | Here's a sample of the raw audio from Session 6B, which had numerous problems. The signal was quite weak in many places, and very hot in other places. As he did in almost all of the sessions, AJG drifted on and off the microphone axis, which affected both the tone and the volume of his voice. |
| • V-50
6B, Raw Audio, +14 dB |
Here's
the same Session 6B segment with a +14 dB boost in the audio gain,
added in the digital domain. There's no other DSP at this point. You
can hear the audio signal better, but the volume boost also brings up
the background noise to an unacceptable level, and the audio becomes
distorted on the highest volume peaks. (See "That Which Is Not Seen",
below) |
| • V-50
6B, with DSP |
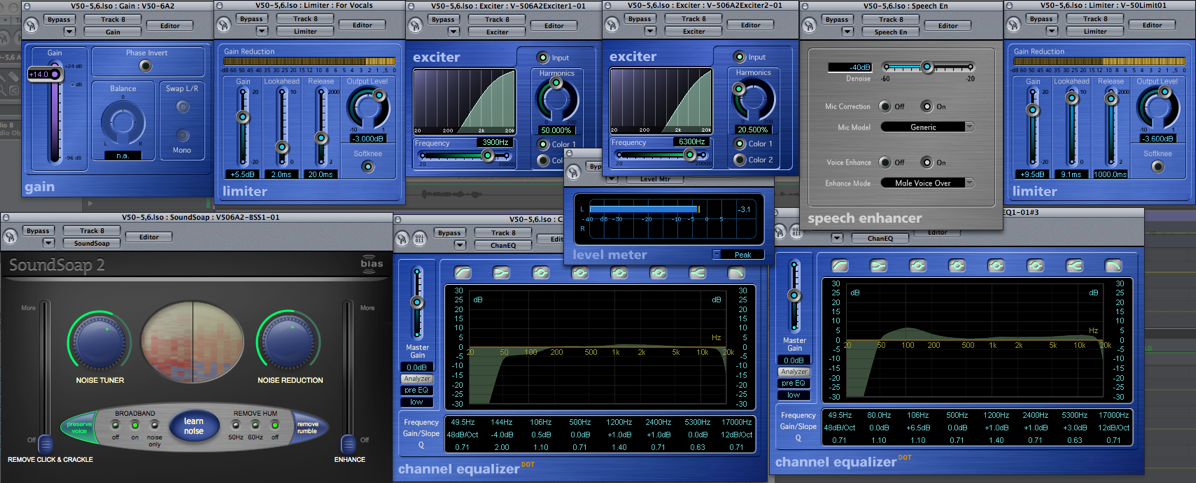
Here's the boosted signal with full
DSP applied. The DSP plugins are many: gain boosting, noise reduction,
peak limiting, two stages of aural excitation, a speech enhancer, two
parametric equalizers, another stage of peak limiting, and a level
meter to ensure that the peaks never exceed a level of -3.0 dBFS. (See
the big screen shot below) |
| • V-50
6B, Noise Only |
Just to give you an idea of the
difference between the DSP audio and the noisy audio, here's a sample
of exactly the same audio segment, with just the noise played back.
This is the noise that the DSP removed
from the program material. |
| That Which Is Not Seen The boost in gain (and the accompanying boost in noise levels) in the V-50 6B, Raw Audio, +14 dB sample is "that which is seen". That which is not seen is the occurrence of intermittent peaks above 0 dBFS (decibels, full-scale), which drives the audio signal into distortion. You probably can't hear it on your computer speakers, but I can hear it on the studio monitors. Even if you don't realize you're hearing it, your brain would hear it, and after about 20 to 30 minutes of that you'd start to get very uncomfortable,  and you wouldn't know why! That's
what would happen to the people hearing the course. It's that same
psychoacoustic phenomenon I've mentioned before, called "listening
fatigue". Here's a screen shot of the channel meter, which I've set to
show peak levels. The part
that goes into the red proves that the peak (in this case, +2.5 dB) is
occurring at the instant I took the screen shot. The upshot of this
nuisance is that you can't simply boost the level to make it "sound
better". The human brain knows better, even if the untrained ear
doesn't. In order to make it really
sound better, you have to add
dynamics processing with a peak limiter, noise reduction, and other
stuff (more on that below). and you wouldn't know why! That's
what would happen to the people hearing the course. It's that same
psychoacoustic phenomenon I've mentioned before, called "listening
fatigue". Here's a screen shot of the channel meter, which I've set to
show peak levels. The part
that goes into the red proves that the peak (in this case, +2.5 dB) is
occurring at the instant I took the screen shot. The upshot of this
nuisance is that you can't simply boost the level to make it "sound
better". The human brain knows better, even if the untrained ear
doesn't. In order to make it really
sound better, you have to add
dynamics processing with a peak limiter, noise reduction, and other
stuff (more on that below). |
|
| One more thing...just to give
you an idea of what it means when I say
"setting up the DSP", here's a screen shot showing the automation
settings for just one
parameter (the high frequency shelf gain) of just one
of the parametric equalizers for the segment of Session 6B I used in
the four audio samples above. The automation control is the green line
with all the dots and numbers that overlay the black audio
waveform amplitude envelope in the screen shot below for the audio file
"V-50-5,6 Audio#16",
which is one of the two files I used for Session 6B: |
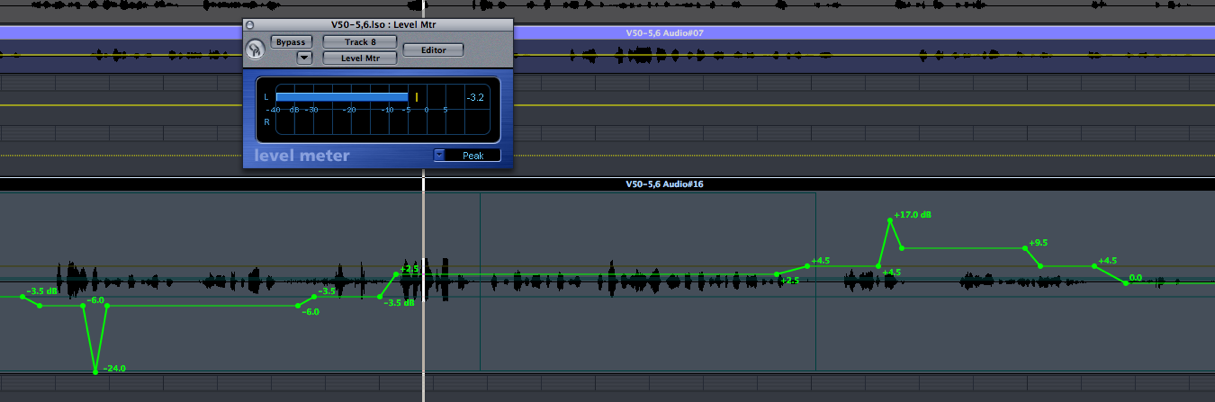
Each of those little green dots
is a point I have to set manually to
control the amount of high frequency boost or cut above 5,300 Hz (hence
the name "shelf") on channel equalizer
number 2. The dot that's marked "+17
dB" means the 5,300 Hz shelf is boosted by that amount at that
point; "-3.5 dB" means
it's cut by that amount, and so on. That's the automation for just one
of the eight bands on the equalizer, and each
band has 4 parameters (frequency, gain, on/off, and Q-factor). The
screen shot on the right shows all the automatable parameters of the
channel equalizer plugin; there are 40 in all...and that's one of eight
plugins. The other plugins have fewer parameters, but you get the
idea...all of the parameters of each plugin are adjustable. The
trick is to find settings that sound the best with the fewest number
of parameter adjustments. name "shelf") on channel equalizer
number 2. The dot that's marked "+17
dB" means the 5,300 Hz shelf is boosted by that amount at that
point; "-3.5 dB" means
it's cut by that amount, and so on. That's the automation for just one
of the eight bands on the equalizer, and each
band has 4 parameters (frequency, gain, on/off, and Q-factor). The
screen shot on the right shows all the automatable parameters of the
channel equalizer plugin; there are 40 in all...and that's one of eight
plugins. The other plugins have fewer parameters, but you get the
idea...all of the parameters of each plugin are adjustable. The
trick is to find settings that sound the best with the fewest number
of parameter adjustments. The squiggly green line shown above represents only the 22 seconds worth of Session 6B you hear in the samples above. Mercifully, most of the audio does not need that degree of adjustment, and most of the parameters don't need to be changed once I find the best sounding settings. Whatever it takes... Anyhow, that's what "setting up DSP" means: make a change, and listen to it. Keep changing it until it's right. Go on to the next part that needs help and repeat as necessary for each parameter of each plugin until finished. Pronounce "Aaarrrggghhh!!!" vigorously as needed. When brain is fried, cease working and drink beer. Oh...see the level meter in the screen shot immediately above? It's reading -3,2 dBFS...which means zero distortion. That's the level at exactly the same point at which the sample previously was reading +2.5 dBFS, into the red and distorting as I described above for the V-50 6B, Raw Audio, +14 dB sample, before I applied the DSP. It also means that the audience won't be getting blasted out at that part if the contractor turns up the volume enough so they don't have to strain to hear other parts. The DSP work wouldn't be so labor intensive if AJG had stayed on the mic axis, if the tapes weren't physically mutilated, if the recordings weren't noisy...and yadda, yadda, yadda — but none of those ifs are true. I'm not complaining; the work can be exasperating at times when I don't have decent audio to work with in the first place, but we're getting good quality product out of all this, and it's satisfying to make it all work out in the end. I'm just showing you a bit of "that which is not seen". |
I built this page in SeaMonkey's Composer app—the same one you already have installed on your computer. The page displays properly in SeaMonkey's Navigator browser...and also in Netscape Navigator, Firefox, Safari, or any other civilized, standards-compliant browser. It contains validated HTML 4.01 transitional code. If you're viewing it in Internet Explorer and it looks like shit, please view it in SeaMonkey Navigator. If it pisses you off that Internet Explorer screws up perfectly good, validated code, I understand completely. You can complain to Monkey Boy if you think it will do any good. |
|